Dinner · Recipes

Taco Stuffed Peppers

Taco Stuffed Peppers

This recipe is tasty, easy and packed with incredible flavor! It just takes a little prep with few ingredients to make this colorful and delicious dish. I really enjoy making this recipe because it’s so easy, in fact, I mostly make this dish through the week…you can also prep ahead of time to!

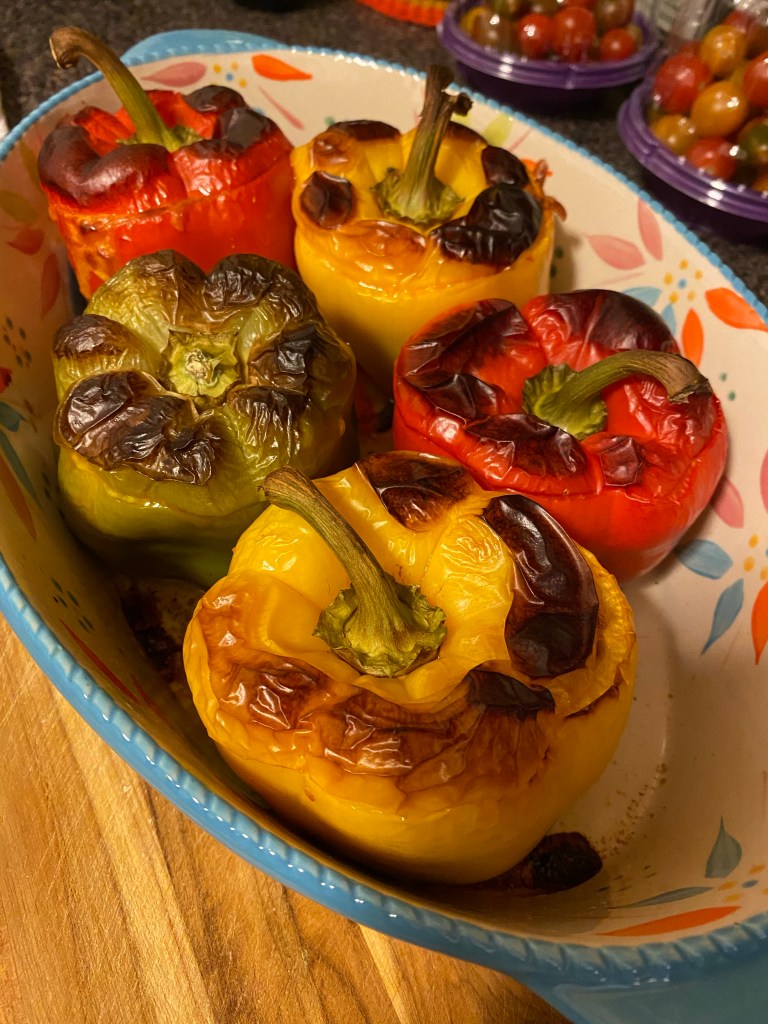
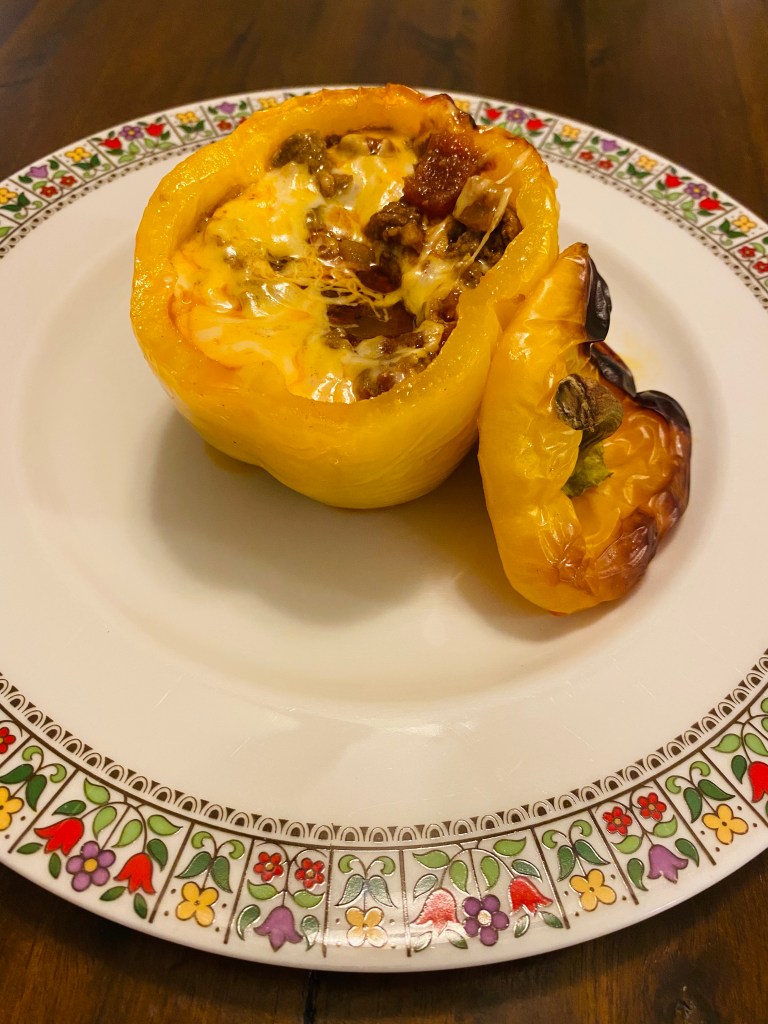
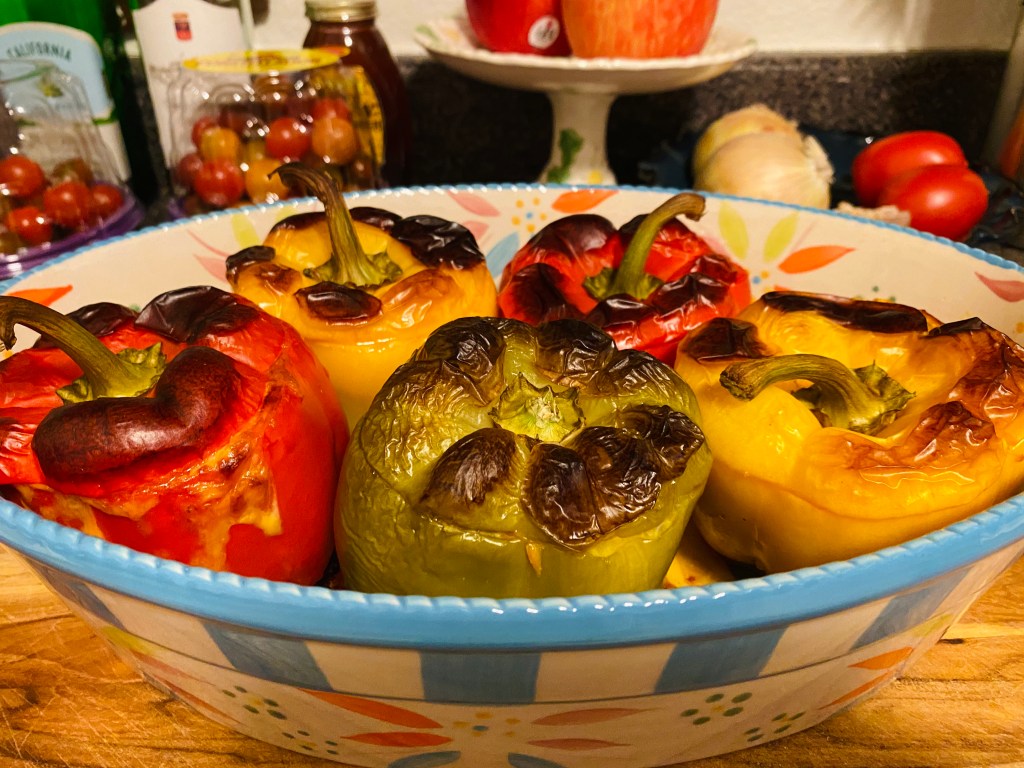
I have used all green peppers in the past, but I think this dish is stunning with red, yellow, green and even orange peppers. The different colored peppers not only add a beautiful presentation, but you can get so many different flavor profiles from the variety bell peppers. These peppers are the vessel for an amazing filling of meat, sauce and gooey cheese….how could that be bad?!

Ingredients for Taco Stuffed Peppers.

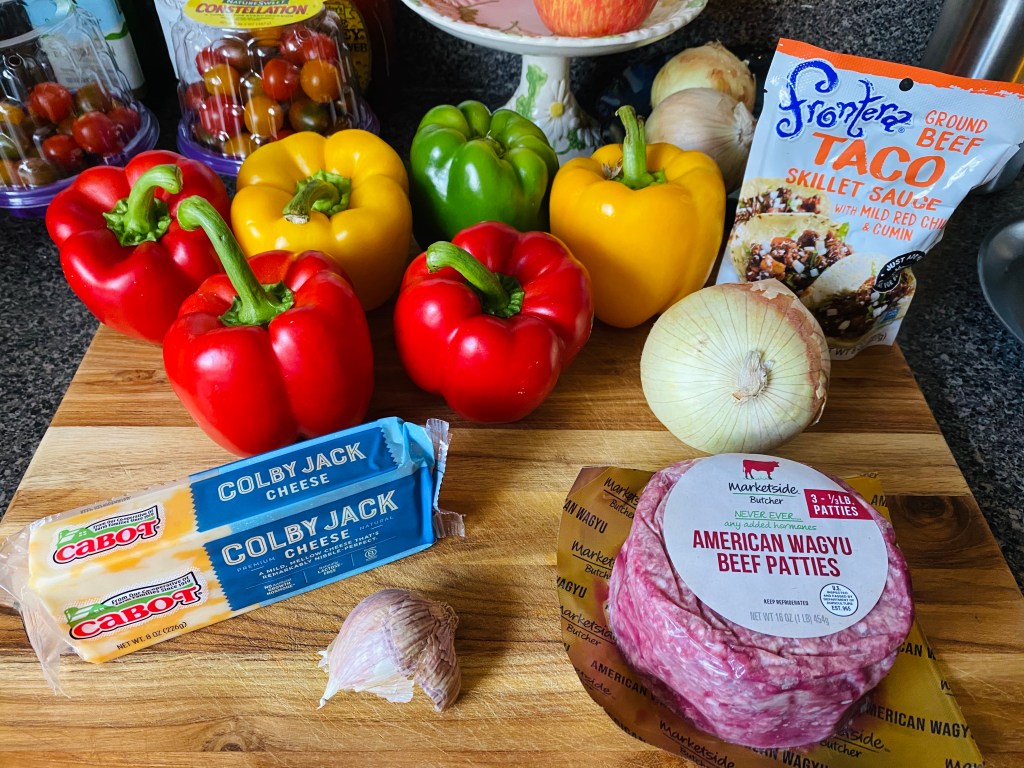
I know I always say that the key to any good recipe becoming a great one is about the quality of your ingredients. I recently discovered the Marketside American Wagyu Beef Patties from Walmart. These beef patties are great and seem to sell out at our local Walmart as fast as they can stock them. They come in 3 1/3 lb packages and that just happens to be the perfect size for this recipe. My family LOVES Cabot Cheese and when I’m cooking any recipe that requires cheese, I always buy a block to shred myself. Most pre-shredded cheeses come with a coating of potato starch. The potato starch is gritty and leaves an oily texture to the pre-shredded cheese which I don’t want in my meal. The Frontera taco sauce adds such a powerful and robust flavor that ties the dish together beautifully.

Taco Stuffed Peppers

This dish is a great make ahead especially if you are making it over the weekend. I typically cook the meat and get the peppers filled then place them in the baking dish. I then Put them in the fridge until I’m ready to bake them. Most of the time I just whip this recipe up and bake them immediately, but you could prep them all the way through prior to baking to save some time. Now, I hope you enjoy this recipe as much as we do!

Taco Stuffed Peppers

TACO STUFFED PEPPERS

Ingredients:

  • 5 to 6 large bell peppers of any color
  • 3 1/3 to 1 lb ground beef
  • 1 Tbsp olive oil
  • 1 large sweet onion, chopped
  • 2 cloves garlic, diced
  • 1 package Frontera Taco Skillet Sauce
  • 1 (8 oz) block of Colby cheese, shredded

Directions:

  • Preheat oven to 350 degrees F.
  • Carefully cut the tops off each pepper; remove seeds from pepper and tops. Reserve the tops of each pepper for topping later.
  • Add olive oil to a sauté pan and turn pan to medium-high heat. Add onions and sauté until they start to turn translucent. Add ground beef; cook until browned. Add garlic and cook an additional 2 minutes.
  • Add sauce to beef mixture and allow to cook for 3 minutes; remove from heat.
  • Add cheese to each pepper bottom, add meat filling to about half way, add more cheese, top with meat and finally top with a little more cheese. do this with each pepper.
  • Top each pepper with its matching top.
  • Add peppers to a baking dish. (If you are prepping this meal to bake later; cover with plastic cling wrap and place in fridge until ready to bake.)
  • Bake peppers for 55 minutes to 1 hour.
  • Remove from oven and allow to cool for 10 minutes.
  • Enjoy!
Dinner · Recipes

Korean Beef Meatballs With A Side of Rice

Korean Beef Meatballs and Rice

One of my goals was to try new things this year and this is one of my favorite new recipes! This recipe is easy, fun, delicious and not to mention…BEAUTIFUL! This recipe has it all…it’s fresh, saucy and full of robust flavors. This recipe even passed the toddler test….that’s right, my three year old cleans her plate when this is on the menu.

This recipe cooks up pretty fast and it uses two of my handiest kitchen appliances; the instant pot and air fryer. As a working mom, these two appliances really come in handy when it’s been a long day and everyone is tired and hungry. You can pretty much guarantee that the air fryer and instant pot are being used at least two times a week in our house. For this recipe I use the instant pot as a rice cooker and the air fryer to cook the meatballs. You could just as easily make this meal without both of these appliances by using the stovetop and oven.

This recipe is perfect for those that like to try new foods and flavors. My husband always says, “you eat with your eyes first”, so I strive for perfect plating when I present meals. This is one of those meals that doesn’t take to much fuss to plate as it is always a beautiful dish! Ingredients are important here to get all of those great flavors. I have also found that most of the ingredients can be found in your kitchen without having to buy up a ton of one off ingredients. That makes it a budget friendly meal as well! Now, I hope you enjoy this recipe as much our family does and don’t forget, if you try it out let me know!

KOREAN BEEF MEATBALLS WITH RICE

Ingredients:

  • 1/2 bag of frozen meatballs
  • 1/4 tsp fresh ground ginger
  • 3 cloves garlic, minced
  • 1/2 cup soy sauce
  • 1/2 cup water
  • 3/4 cup light brown sugar
  • 1 Tbsp Sriracha Sauce
  • 1 Tbsp rice wine vinegar
  • 1 tsp sesame oil
  • 1 Tbsp cornstarch
  • 1 Tbsp water
  • Cucumber, slices into thin rounds
  • Peanuts, chopped (for garnish)
  • Sesame seeds, lightly toasted (for garnish)
  • Green onion, for garnish

Directions:

  • Make rice in instant pot according to instant rice cooking directions.
  • Once instant pot is performing the natural release, add meatballs to air fryer and cook for 8 to 10 minutes at 350 degree’s F.
  • While meatballs are cooking, in a medium sauce pan combine ginger, garlic, soy sauce, water, brown sugar, Sriracha,vinegar and sesame oil. Bring to a simmer. Mix together cornstarch and tbsp of water and add to sauce.
  • Reduce heat to low and allow to simmer for 8 to 10 minutes.
  • Add meatballs to sauce.
  • To plate; add rice topped with meatballs, drizzle with sauce and top with a sprinkle of sesame seeds, green onion and peanuts.
  • Add thinly sliced cucumber in the side of dish.
  • Enjoy!
Dinner · Recipes

Honey Chicken with Garlic Couscous

Honey Chicken with Garlic Couscous

I am really excited to share this Honey Chicken with Garlic Couscous with you! Chicken is one of my favorite mainstays at any dinner setting. I can’t think of a week going by without some form of a chicken dish on our table. This particular recipe is fast, easy and delicious! It’s a little on the messy side as far as cleanup goes, but you’re supposed to get a little messy in the kitchen, right?!

Ingredients for Honey Chicken with Garlic Couscous.

This meal isn’t quite a 30 minute meal, but more like a 45 minute meal which isn’t half bad considering how delicious and packed full of flavor this meal is. Part of what gives this meal so much flavor is something I love…Better Than Bullion as my stock base…I have it almost every flavor in my pantry. If you are running low on chicken stock you could substitute veggie stock in this recipe and it wouldn’t alter the taste that much. I also use a blend of thyme, salt, pepper and garlic powder as my main seasoning to accompany the honey. The key to this dish is also getting a good sear on the chicken and you can only do that with a hot pan.

Just dropped the chicken thighs in the hot pan!

Some tips I use when cooking multiple pieces of food in a pan is to place the chicken in a clockwise motion in order to know when to flip each piece. Also laying the chicken in the pan in a motion going away from your body will ensure that you will not get splashed with grease. Each piece of chicken needs to cook the same amount of time, so timing is very important…this will ensure that each piece of chicken has been properly cooked. When I say this recipe has a crazy amount of flavor, I mean it! This chicken is not only juicy, but each bite is savory and sweet. I can now vouch that this recipe holds up to the leftover challenge…it is delicious and withstands being reheated for lunch the following day with no rubbery chicken issues. Now, I hope you enjoy this recipe as much as we did!

Honey Chicken with Garlic Couscous

Honey Chicken With Garlic Couscous

Ingredients:

  • 2 lbs boneless, skinless chicken thighs
  • 2 Tbsp olive oil
  • 2 Tbsp honey
  • 1/2 tsp thyme
  • 1/2 tsp salt
  • 1/2 tsp pepper
  • 1 tsp garlic powder
  • 2 boxes Garlic Olive Oil Pearl Couscous
  • 3 cups chicken stock
  • 1 (5 oz) package of fresh spinach

Directions:

  • Preheat oven to 425 degrees F and preheat cast iron skillet on stove top to med-high heat.
  • Pat chicken down with paper towels then rub each piece with honey; sprinkle with thyme, salt, pepper and garlic powder.
  • Add couscous seasoning packet to chicken stock and set aside.
  • Add oil to pan; once oil is hot add chicken and let brown for 5 minutes each side. Remove chicken from pan and let rest of a plate.
  • Add couscous and spinach to pan; cook for 2 minutes or until couscous is browned and spinach has wilted.
  • Add stock mixture to pan and bring up to simmer. Once simmering add chicken back to pan and place in oven.
  • Cook in oven for 12 to 15 minutes, or until most of the liquid has been absorbed and the chicken is done.
  • Remove from oven and let rest for 5 minutes before serving.
  • Enjoy!

This recipe serves 4 with a small portion of leftovers.

Cookies · Recipes

Like Grandma’s Oatmeal Cookies

Like Grandma’s Oatmeal Cookies cooking on the cooking rack.

Who doesn’t LOVE a good cookie? Cookies happen to be one of my favorite sweet treats, because they can come in so many varieties. From sweet to salty, chewy to crunchy, chocolate chips to oatmeal…so many varieties…plus they are easy to grab and go! Cookies are the best treats in my opinion. Whether I am by myself in the kitchen or with my family I always have a fun time making cookies. Cookies always take me back to past times and allows me to reflect on the old days…that’s why I want to share my Like Grandma’s Oatmeal Cookie recipe with you!

My Nanny’s mixing bowl.

I have a special bowl that I use when I am baking for my family, because baking to me is a way to remember those who have since passed on. My Nanny’s bowl is my FAVORITE mixing bowl. I remember so many delicious meals and baked treats that she would mix together in this very bowl. I like the tradition of baking and I want to pass this one recipe on to my daughter along with this mixing bowl.

Like Grandma’s Oatmeal Cookies

This recipe is easy and delicious…plus once you get started your house will smell amazing! This recipe makes roughly 40 cookies, so be sure to store in an airtight container after they have cooled completely. These cookies should last a week if stored properly, but we’ve never made it past a couple of days! I hope you enjoy this recipe as much as my family and I do!

Like Grandma’s Oatmeal Cookies with a glass of milk.

Like Grandma’s Oatmeal Cookies

Ingredients:

  • 1 cup unsalted butter, softened
  • 1 cup white sugar
  • 1 cup brown sugar, packed
  • 2 large eggs, slightly beaten
  • 1 1/2 tsp vanilla extract
  • 2 cups all purpose flour, sifted
  • 1 tsp salt
  • 1 tsp baking soda
  • 1 1/2 tsp ground cinnamon
  • 3 cups quick cooking oats

Directions:

  • Preheat oven to 375 degrees F and lime baking tray with parchment paper.
  • In a large mixing bowl; cream butter with white and brown sugar. Add extract and eggs until well blended.
  • Using a sifter; sift flour, baking soda, salt and cinnamon into wet mixture and mix well.
  • Mix in oats.
  • Use a small cookie scoop and drop cookie dough about 2 inches apart on the lined baking pan.
  • Flatten each cookie slightly.
  • Bake at 375 degrees F for 7 to 8 minutes. Remove from oven and allow to cool on pan for 5 minutes then transfer to cooling rack to cool completely.
  • Enjoy with a tall glass of milk!
  • Store any leftovers in an airtight container or cookie jar.

This recipe makes roughly 40 small cookies.