Breakfast · Recipes

Pecan Carrot Zucchini Bread

Pecan Carrot Zucchini Bread

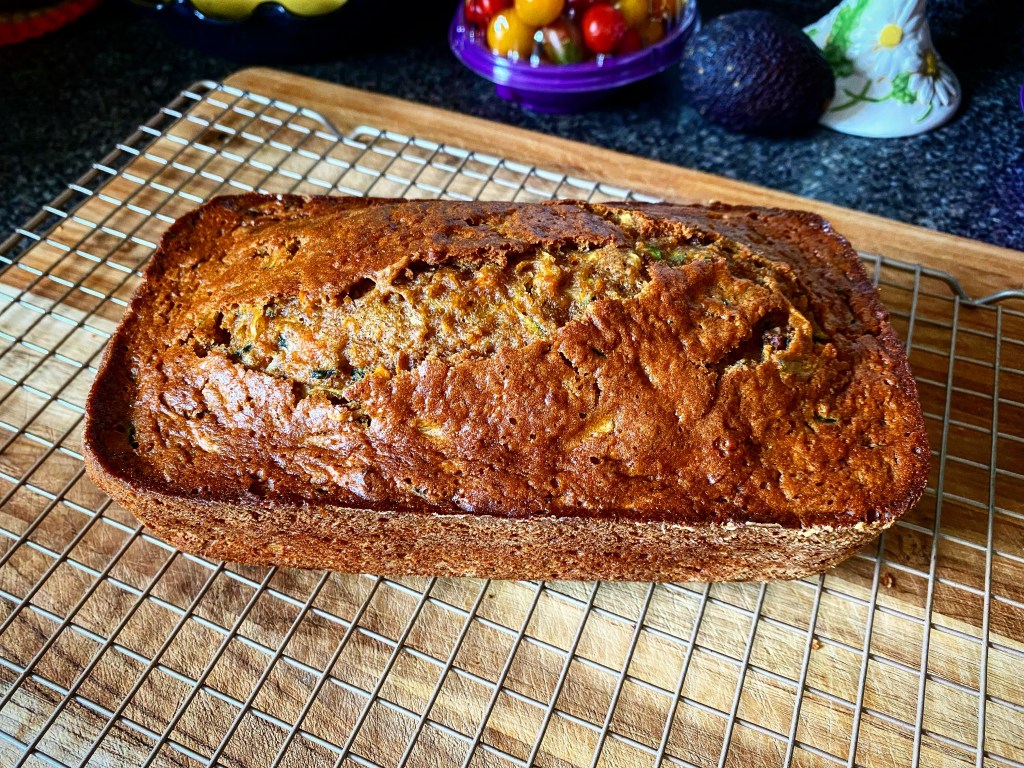
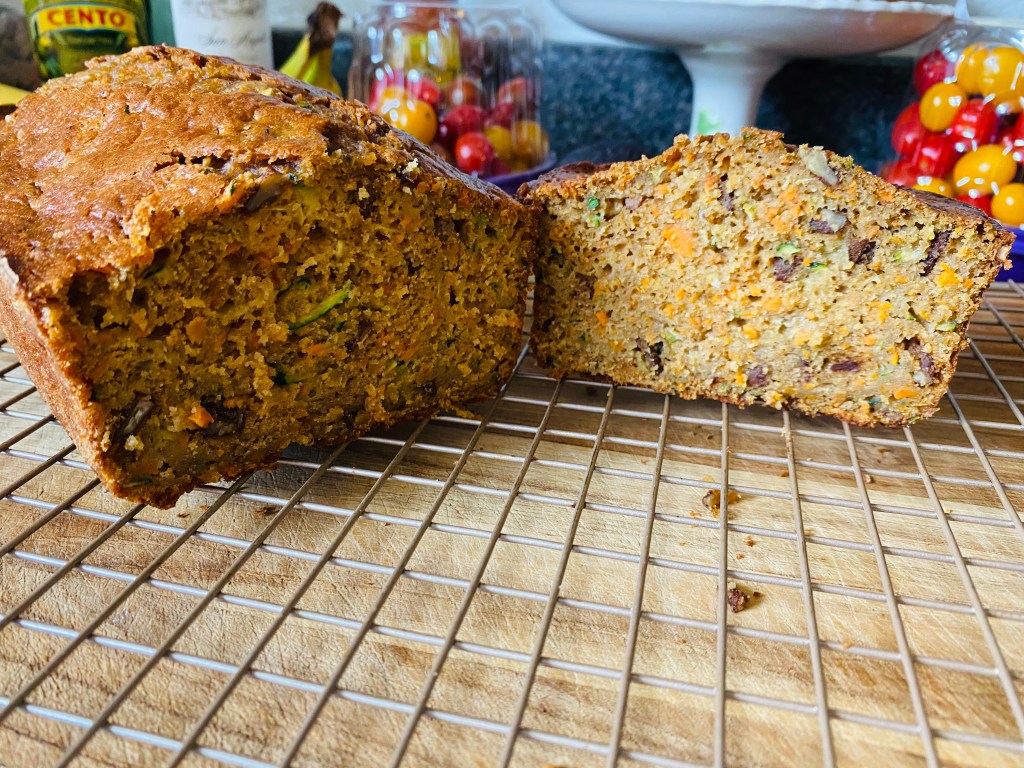
Looking for a sweet and healthy treat to start your day? Well, this Pecan Carrot Zucchini Bread is everything that you’re looking for. It’s simple to make, sweet, healthy and leaves your kitchen smelling like a crisp fall day. It will only take a few ingredients to make this deliciously healthy bread and this type of recipe is yet another great way to get the kids involved. Now, I hope you will enjoy this recipe as much as we do!

Pecan Carrot Zucchini Bread

PECAN CARROT ZUCCHINI BREAD

Ingredients:

  • 1 1/2 cup all purpose flour
  • 1 tsp baking powder
  • 1/2 tsp salt
  • 1/2 tsp baking soda
  • 1/2 cup granulated sugar
  • 1/4 cup dark brown sugar, packed
  • 1 tsp ground cinnamon
  • A dash of freshly ground nutmeg
  • 2 eggs
  • 1/4 cup vegetable oil
  • 3 Tbsp applesauce (or 1 kids pouch)
  • 1 tsp vanilla extract
  • 1 medium/large zucchini, shredded (about 3/4 cup)
  • 3/4 cup shredded carrots
  • 1/2 cup pecans, chopped
  • 1 Tbsp unsalted butter
  • 1 1/2 Tbsp all purpose flour

Directions:

  • Preheat oven to 350 degrees F. Prep loaf pan by using unsalted butter and rubbing it thoroughly throughout the pan; dust buttered pan with 1 1/2 Tbsp of flour and dump any extra flour. This will prevent the loaf from sticking to the pan.
  • Shred zucchini and carrots in a large bowl and set aside.
  • In a large mixing bowl sift flour, baking powder, salt, baking soda, cinnamon and nutmeg together to make sure all dry ingredients are thoroughly mixed.
  • In a smaller mixing bowl add white and brown sugar, eggs, oil, applesauce, and vanilla extract; mix thoroughly.
  • Add wet ingredients to dry and mix together for about 1 minute or until thoroughly mixed.
  • Fold in zucchini, carrots, and pecans.
  • Add to prepped loaf pan. Cook uncovered for 30 minutes. Check bread for browning. If it is the color you like place tin foil on top to prevent further browning and place back in oven for an additional 15 to 20 minutes.
  • Test the bread to see if it isdone by using a toothpick. If the toothpick comes out clean, the bread is done.
  • Allow to cool for 10 minutes in the loaf pan. Remove from pan and allow to cool completely on a wire rack; may take about an hour.
  • Enjoy!
Breakfast · Recipes

Banana Bread Crunch Muffins

Banana Bread Crunch Muffins

I’m not going to beat around the bush….these muffins are AMAZING! Muffins are perhaps my favorite sweet-treat breakfast and we love making them as much as we love eating them plus the smell is guaranteed to make your kitchen smell fabulous. This recipe is both easy and quick, so they are perfect for making on the fly or for prepping for the busy week ahead. They taste delicious while warm or cool and they keep for about a week…if they last that long! What makes these delicious muffins so special is the crunchy topping which has both a toasted and sweet flavor.

My daughter helping to mix the muffins.

Making muffins is one of my favorite ways to teach my three-year-old about baking. I even used this recipe as a science lesson for her and she felt like such a big girl while mixing the ingredients together. She also really enjoyed putting the topping on each muffin, but I’m sure her favorite part is getting to eat one! This is overall an easy recipe to get the kids involved. Now, I hope you enjoy this recipe as much as we do!

Banana Bread Crunch Muffins

BANANA BREAD CRUNCH MUFFINS

Ingredients:

For muffins:

  • 1 1/2 cups all purpose flour
  • 1/2 tsp salt
  • 1 tsp baking soda
  • 1 tsp baking powder
  • 1 egg
  • 3/4 cup granulated sugar
  • 3 very ripe bananas, mashed

For crunchy topping:

  • 2 Tbsp all purpose flour
  • 1/2 tsp ground cinnamon
  • 1/3 cup light brown sugar, packed
  • 2 Tbsp butter, softened
  • 1 Tbsp pecans, crushed
  • A tiny dash of Sea Salt

Directions:

  • Preheat oven to 350 degrees F.
  • Prepare a muffin tin by adding muffin liners and spraying liners with a bit of nonstick cooking spray.
  • In a large mixing bowl, sift flour, salt, baking soda, and baking powder together. In a separate bowl mash bananas and mix in egg and sugar.
  • Combine wet ingredients into dry and mix well.
  • Pour into muffin liners and tap muffin pan to allow for even muffins.
  • Make the topping by mixing together all ingredients until crumbly.
  • Top each muffin with a generous amount of crunchy topping.
  • Bake for 17 to 22 minutes or until a toothpick inserted into the muffins comes out clean.
  • Enjoy!
Breakfast · Recipes

Asparagus Breakfast Tart

Asparagus Breakfast Tart

I love nothing more than eating crunchy asparagus, salty bacon, creamy Parmesan cheese, yolky eggs, and crispy puff pastry. the best word to sum up this delicious recipe is simply YUM! If you’re looking for an easy recipe that is super tasty…this one is for you!

I love making this recipe for my family as a fast and easy dinner, but I have also made this as a brunch with a small side salad for my friends. This dish doesn’t just look impressive but tastes impressive as well. I typically cook the bacon first as I like to drain and dab off any grease as not to make the pastry crust soggy. I also coat the asparagus in a touch of olive oil, salt, pepper, garlic, and onion powder to give it a stepped up flavor. Once I’m ready to put it all together I prep the pastry sheet and start building the tart. A fun way to get the kids involved is to let them carefully crack the eggs on the tart just before baking. I even let my daughter help with sprinkling the Parmesan cheese on top. Now, I hope you enjoy this recipe as much as we do!

Asparagus Breakfast Tart

ASPARAGUS BREAKFAST TART

Ingredients:

  • 1 puff pastry sheet, thawed
  • 1 egg, beaten
  • 3 to 4 eggs
  • 1 bundle of asparagus, trimmed
  • 1 Tbsp olive oil
  • Dash of salt, pepper, garlic powder, and onion powder
  • 6 slices bacon, cooked
  • 1/4 cup Parmesan cheese, shredded
  • 1 Tbsp parsley, chopped

Directions:

  • Preheat oven to 400 degrees F.
  • Toss asparagus in olive oil, salt, pepper, garlic and onion powder. Set aside.
  • Roll out puff pastry to desired size on a lightly floured surface. Food up each side and tuck corners to make a border. Using a fork, polk holes throughout the center of the pastry. Move to parchment paper lined baking tray and refrigerate for about 10 minutes.
  • Arrange asparagus on tart within the borders of the tart, add bacon being sure to leave room for eggs. Add half the cheese, then carefully crack eggs onto tart being careful to not break the yolks. Top with remaining cheese.
  • Generously brush border with beaten egg for a golden crust.
  • Bake for 8 to 10 minutes or until the egg whites are set; egg yolks should still be wiggly.
  • Allow to cool and sprinkle with parsley.
  • Enjoy!
Dinner · Recipes

Chicken and Veggie Pasta Bake

This is a yummy was to bake up a fast weeknight meal that is packed full of something everyone loves! I like to make this Chicken and Veggie Pasta Bake on the regular and I really enjoy how versatile this dish is. You can choose all sorts of veggie combinations with this recipe. It should be fun to try new combos. Keep in mind the season as you could always utilize fresh from the garden veggies like squash and zucchini or even a variety of peppers. In the winter months, I like to use mushrooms and peas because frozen peas work great in a dish like this. There are a couple of staples that are must for a deep and rich flavor. Those staples include Parmesan cheese and sliced almonds. Without these key ingredients your dish would be missing that crunchy topping that completes the whole dish. Now, I hope you enjoy this recipe as much as we do!

Chicken And Veggie Pasta Bake

CHICKEN AND VEGGIE PASTA BAKE

Ingredients:

  • 1 1/2 lb boneless, skinless chicken breast, cooked and sliced (cook it how you like it…grilled is our favorite!)
  • 3 Tbsp olive oil
  • 1/2 (16 oz) pkg angel hair pasta, cooked and cooled
  • 1 (8 oz) pkg mushrooms, sliced
  • 1 bundle asparagus, cut into 1 1/2 inch pieces
  • 1/4 cup butter
  • 3 Tbsp white wine
  • 3 Tbsp flour
  • 3 cups milk (room temp)
  • 1 cup Parmesan cheese, shredded
  • 1/2 cup sliced almonds
  • Salt and pepper to taste

Directions:

  • Cook chicken according to your preference. We prefer to grill the chicken, rest it and then slice it. You could even bake or roast the chicken and then shred it.
  • Preheat the oven to 350 degrees F and butter a casserole dish.
  • Cook pasta to just under; should only boil for 1 minute.
  • Sauté mushrooms in a hot pan until juices start to run out and they become brown, add white wine and asparagus; cook for 3 additional minutes. Remove veggies and leave liquid in the hot pan.
  • Add butter to liquid and allow to melt and bubble. Add flour and cook for 2 minutes or until the flour smell has dissipated; add milk and cook for 5 minutes stirring constantly. Once gravy is thick remove from heat.
  • Stir in 1/2 cup of cheese and add pasta, veggies and chicken; combine well.
  • Add pasta mixture to baking dish. Top with almonds and the rest of the cheese.
  • Bake for 20 minutes or until bubbly.
  • Let rest for a couple of minutes before serving.
  • Enjoy!
Cookies · Recipes

Like Grandma’s Oatmeal Cookies

Like Grandma’s Oatmeal Cookies cooking on the cooking rack.

Who doesn’t LOVE a good cookie? Cookies happen to be one of my favorite sweet treats, because they can come in so many varieties. From sweet to salty, chewy to crunchy, chocolate chips to oatmeal…so many varieties…plus they are easy to grab and go! Cookies are the best treats in my opinion. Whether I am by myself in the kitchen or with my family I always have a fun time making cookies. Cookies always take me back to past times and allows me to reflect on the old days…that’s why I want to share my Like Grandma’s Oatmeal Cookie recipe with you!

My Nanny’s mixing bowl.

I have a special bowl that I use when I am baking for my family, because baking to me is a way to remember those who have since passed on. My Nanny’s bowl is my FAVORITE mixing bowl. I remember so many delicious meals and baked treats that she would mix together in this very bowl. I like the tradition of baking and I want to pass this one recipe on to my daughter along with this mixing bowl.

Like Grandma’s Oatmeal Cookies

This recipe is easy and delicious…plus once you get started your house will smell amazing! This recipe makes roughly 40 cookies, so be sure to store in an airtight container after they have cooled completely. These cookies should last a week if stored properly, but we’ve never made it past a couple of days! I hope you enjoy this recipe as much as my family and I do!

Like Grandma’s Oatmeal Cookies with a glass of milk.

Like Grandma’s Oatmeal Cookies

Ingredients:

  • 1 cup unsalted butter, softened
  • 1 cup white sugar
  • 1 cup brown sugar, packed
  • 2 large eggs, slightly beaten
  • 1 1/2 tsp vanilla extract
  • 2 cups all purpose flour, sifted
  • 1 tsp salt
  • 1 tsp baking soda
  • 1 1/2 tsp ground cinnamon
  • 3 cups quick cooking oats

Directions:

  • Preheat oven to 375 degrees F and lime baking tray with parchment paper.
  • In a large mixing bowl; cream butter with white and brown sugar. Add extract and eggs until well blended.
  • Using a sifter; sift flour, baking soda, salt and cinnamon into wet mixture and mix well.
  • Mix in oats.
  • Use a small cookie scoop and drop cookie dough about 2 inches apart on the lined baking pan.
  • Flatten each cookie slightly.
  • Bake at 375 degrees F for 7 to 8 minutes. Remove from oven and allow to cool on pan for 5 minutes then transfer to cooling rack to cool completely.
  • Enjoy with a tall glass of milk!
  • Store any leftovers in an airtight container or cookie jar.

This recipe makes roughly 40 small cookies.

Pie · Recipes

Nothing Like A Little Pie!

This is my first post and I am super excited to share this with you! My family loves sweet treats, but we rarely have them around the house. Usually we treat ourselves to an ice cream or milkshake out, but since Covid-19 struck we’ve been making our sweet treats at home. Since Memorial Day weekend is different this year I wanted to make something easy yet delicious! I decided to try my hand at making a French Silk Pie and the only thing I can say is “WOW”! It’s crispy crust leads to a chewy brownie, followed by a creamy chocolate filling and finished by a smooth topping of whipped cream with little bits of freshly shaved dark chocolate. You get such a rush of dark chocolate in every bite…so rich and tasty!

This pie is so simple and easy and doesn’t require a ton of clean up (which is my favorite part…LOL). It all starts with a pie crust and a dark chocolate brownie, followed by a cream cheese blend of bittersweet dark chocolate and LOTS of whipped cream. How could that not be tasty, right? I have shared some tips and substitution possibilities below as well as the recipe itself.

Some of the French Silk Pie ingredients that I used to make this delicious pie for my family.

I really enjoy the flavors of dark chocolate over milk chocolate, but you could totally use a milk chocolate brownie mix and milk chocolate bittersweet bar if you prefer that over the dark chocolate flavor. I also like using free range eggs and that’s just a preference that I have, but you could use whatever eggs you’re used to as long as they are large eggs. One tip that I have is that if you forget to put your cream cheese out on the counter to soften, you can always take it out of the foil packaging, place it on a microwaveable plate and zap it for 10 seconds on high. This will help it to soften without cooking it. Now on to the recipe!

French Silk Pie

Ingredients:

  • 1/2 (pkg) of a pre-made pie crust
  • 1 pkg dark chocolate brownie mix
  • 1 (8 oz) block of cream cheese, softened
  • 1 (4 oz) bar of bittersweet dark chocolate, melted and slightly cooled (reserve a half of a piece for garnish)
  • 2 (8 oz) containers of whipped topping, thawed

Directions:

  • Preheat oven to 350 degrees F.
  • Unroll pie crust and fit to bottom and up sides of a 9-inch pie plate.
  • Prepare brownie mix per the directions on the box and poor onto pie crust. Bake for 30 to 35 minutes or until brownie and pie crust are done. Cool on wire rack until completely cooled.
  • Using an electric hand mixer, beat softened cream cheese in a medium bowl until well whipped. Add melted dark chocolate and beat at low speed until well blended. Slowly fold in one container of whipped topping.
  • Add chocolate cream cheese mixture to top of cooled brownie. Add the other container of whipped topping onto top of chocolate mixer. Shave dark chocolate onto the pie.
  • Allow to chill at least 4 hours before serving.
  • This recipe serves about 10 people.

I hope you had fun making this pie and I hope that you enjoy it as much as my family does! Remember if you have recipes or tips that you like for me to try, please share them!