Dinner · Recipes

Korean Beef Meatballs With A Side of Rice

Korean Beef Meatballs and Rice

One of my goals was to try new things this year and this is one of my favorite new recipes! This recipe is easy, fun, delicious and not to mention…BEAUTIFUL! This recipe has it all…it’s fresh, saucy and full of robust flavors. This recipe even passed the toddler test….that’s right, my three year old cleans her plate when this is on the menu.

This recipe cooks up pretty fast and it uses two of my handiest kitchen appliances; the instant pot and air fryer. As a working mom, these two appliances really come in handy when it’s been a long day and everyone is tired and hungry. You can pretty much guarantee that the air fryer and instant pot are being used at least two times a week in our house. For this recipe I use the instant pot as a rice cooker and the air fryer to cook the meatballs. You could just as easily make this meal without both of these appliances by using the stovetop and oven.

This recipe is perfect for those that like to try new foods and flavors. My husband always says, “you eat with your eyes first”, so I strive for perfect plating when I present meals. This is one of those meals that doesn’t take to much fuss to plate as it is always a beautiful dish! Ingredients are important here to get all of those great flavors. I have also found that most of the ingredients can be found in your kitchen without having to buy up a ton of one off ingredients. That makes it a budget friendly meal as well! Now, I hope you enjoy this recipe as much our family does and don’t forget, if you try it out let me know!

KOREAN BEEF MEATBALLS WITH RICE

Ingredients:

  • 1/2 bag of frozen meatballs
  • 1/4 tsp fresh ground ginger
  • 3 cloves garlic, minced
  • 1/2 cup soy sauce
  • 1/2 cup water
  • 3/4 cup light brown sugar
  • 1 Tbsp Sriracha Sauce
  • 1 Tbsp rice wine vinegar
  • 1 tsp sesame oil
  • 1 Tbsp cornstarch
  • 1 Tbsp water
  • Cucumber, slices into thin rounds
  • Peanuts, chopped (for garnish)
  • Sesame seeds, lightly toasted (for garnish)
  • Green onion, for garnish

Directions:

  • Make rice in instant pot according to instant rice cooking directions.
  • Once instant pot is performing the natural release, add meatballs to air fryer and cook for 8 to 10 minutes at 350 degree’s F.
  • While meatballs are cooking, in a medium sauce pan combine ginger, garlic, soy sauce, water, brown sugar, Sriracha,vinegar and sesame oil. Bring to a simmer. Mix together cornstarch and tbsp of water and add to sauce.
  • Reduce heat to low and allow to simmer for 8 to 10 minutes.
  • Add meatballs to sauce.
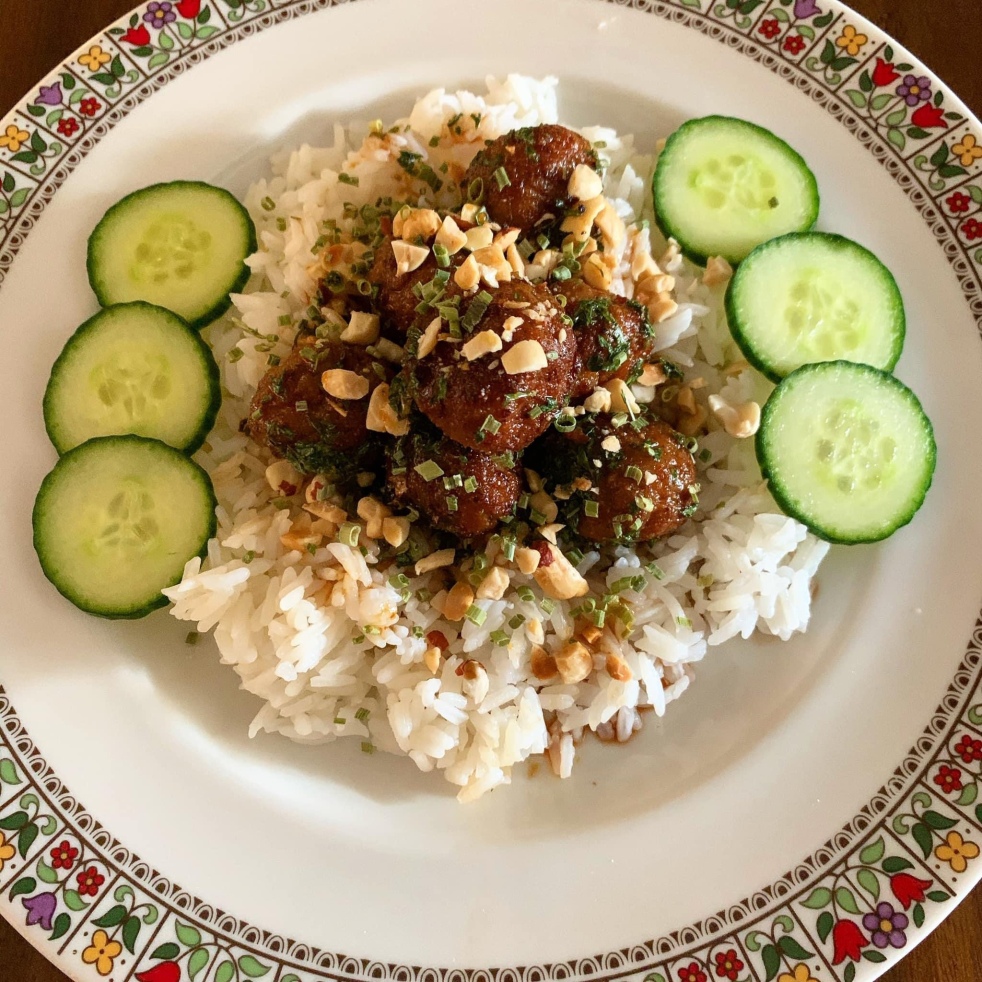
  • To plate; add rice topped with meatballs, drizzle with sauce and top with a sprinkle of sesame seeds, green onion and peanuts.
  • Add thinly sliced cucumber in the side of dish.
  • Enjoy!
Dinner · Recipes

A Simple & Healthy Egg Roll Bowl

Egg Roll Bowl

This is a popular recipe at our house that is fast and easy to make in the middle of the work week. My husband is especially fond of this dish and even offers to make it most of the time. To make thing easier…this is an Instant Pot recipe! For the longest time I wanted an Instant Pot to utilize as a multi cooker. I knew I would be able to utilize its many features in various ways when I needed to make something fast. This recipe is a great way to use the Instant Pot in two ways…first as a rice cooker and second as a pressure cooker.

I typically utilize my Instant Pot when I need to make soups, rice or cook up some fast chicken breast for shredding into a recipe. This recipe also uses the sauté feature which helps to jump start everything. I think you’ll find this recipe an easy one and maybe even one that you add into your meal rotation. Now, I am happy to share how easy and fast this meal is and I know you will enjoy it!

Egg Roll Bowl

Ingredients:

  • 1 lb ground chicken
  • 1 cup rice (cooked in instant pot on rice cooker setting)
  • 1 cup water
  • 1 bag of multi colored slaw mix
  • 1/2 cup chicken broth (I like Better Than Bullion)
  • 1 Tbsp soy sauce
  • 1 Tbsp garlic powder
  • 1 Tbsp ground ginger
  • 1/2 tsp salt
  • 1/2 tsp pepper
  • 1 crown of broccoli, cut into florets
  • La Choy noodles (soup and salad topper)

Directions:

  • Cook the rice first. Put rice and water in instant pot, select rice cooker function and close lid with valve in sealed position. This will auto set to 12 minutes then natural release for an additional 10 minutes. Once natural release has reached 10 minutes past cook time of 12; quick release. Once valve has lowered open lid.
  • Place rice in a separate bowl to cool.
  • Turn instant pot to sauté and wait 30 seconds. Add chicken, soy sauce, garlic powder, salt, pepper and ginger; brown meat.
  • When meat is done; turn instant pot off. Add stock and slaw mix; do not stir. Close lid and turn valve to sealed position for pressure cooking.
  • Set the instant pot to ‘0’ minutes. Once done; perform a quick release and when pressure valve has lowered; open lid.
  • Do not stir. Add broccoli and close lid again and set to pressure cook for ‘0’ minutes. Once done ; perform a quick release and when pressure valve has lowered; open lid.
  • Stir and place in serving bowls on top of rice. Top with noodle toppers and enjoy!
Dinner · Recipes

Honey Chicken with Garlic Couscous

Honey Chicken with Garlic Couscous

I am really excited to share this Honey Chicken with Garlic Couscous with you! Chicken is one of my favorite mainstays at any dinner setting. I can’t think of a week going by without some form of a chicken dish on our table. This particular recipe is fast, easy and delicious! It’s a little on the messy side as far as cleanup goes, but you’re supposed to get a little messy in the kitchen, right?!

Ingredients for Honey Chicken with Garlic Couscous.

This meal isn’t quite a 30 minute meal, but more like a 45 minute meal which isn’t half bad considering how delicious and packed full of flavor this meal is. Part of what gives this meal so much flavor is something I love…Better Than Bullion as my stock base…I have it almost every flavor in my pantry. If you are running low on chicken stock you could substitute veggie stock in this recipe and it wouldn’t alter the taste that much. I also use a blend of thyme, salt, pepper and garlic powder as my main seasoning to accompany the honey. The key to this dish is also getting a good sear on the chicken and you can only do that with a hot pan.

Just dropped the chicken thighs in the hot pan!

Some tips I use when cooking multiple pieces of food in a pan is to place the chicken in a clockwise motion in order to know when to flip each piece. Also laying the chicken in the pan in a motion going away from your body will ensure that you will not get splashed with grease. Each piece of chicken needs to cook the same amount of time, so timing is very important…this will ensure that each piece of chicken has been properly cooked. When I say this recipe has a crazy amount of flavor, I mean it! This chicken is not only juicy, but each bite is savory and sweet. I can now vouch that this recipe holds up to the leftover challenge…it is delicious and withstands being reheated for lunch the following day with no rubbery chicken issues. Now, I hope you enjoy this recipe as much as we did!

Honey Chicken with Garlic Couscous

Honey Chicken With Garlic Couscous

Ingredients:

  • 2 lbs boneless, skinless chicken thighs
  • 2 Tbsp olive oil
  • 2 Tbsp honey
  • 1/2 tsp thyme
  • 1/2 tsp salt
  • 1/2 tsp pepper
  • 1 tsp garlic powder
  • 2 boxes Garlic Olive Oil Pearl Couscous
  • 3 cups chicken stock
  • 1 (5 oz) package of fresh spinach

Directions:

  • Preheat oven to 425 degrees F and preheat cast iron skillet on stove top to med-high heat.
  • Pat chicken down with paper towels then rub each piece with honey; sprinkle with thyme, salt, pepper and garlic powder.
  • Add couscous seasoning packet to chicken stock and set aside.
  • Add oil to pan; once oil is hot add chicken and let brown for 5 minutes each side. Remove chicken from pan and let rest of a plate.
  • Add couscous and spinach to pan; cook for 2 minutes or until couscous is browned and spinach has wilted.
  • Add stock mixture to pan and bring up to simmer. Once simmering add chicken back to pan and place in oven.
  • Cook in oven for 12 to 15 minutes, or until most of the liquid has been absorbed and the chicken is done.
  • Remove from oven and let rest for 5 minutes before serving.
  • Enjoy!

This recipe serves 4 with a small portion of leftovers.

Dinner · Recipes

A Classic….Sloppy Joe!

Sloppy Joe with Homestyle French Fries

When I was a kid I didn’t really like the typical Sloppy Joe from a can. My dad, who was the family cook, always made me something else when Sloppy Joes were on the menu. I decided a few weeks ago that I wanted to bring back a “classic”, but make it how I would like it.

The key to a successful Sloppy Joe is patience! Really take your time and let the ingredients stew in a nice Dutch oven to reduce and soak up all the liquid will make all the difference in the world. I feel like with a recipe like this you can make as custom as you’d like. I’m not a fan of soggy bread, so I reduce mine down for a few hours and I also like to toast up my bread a touch to keep it from getting too soggy. As always try to invest in good ingredients for the best results. I hope you enjoy my take on this classic recipe!

Sloppy Joe

Sloppy Joe

Ingredients:

  • 1 lb ground turkey
  • 1/2 lb ground beef
  • 1 sweet onion, chopped
  • 3/4 cup tomato sauce
  • 1/2 cup chicken stock
  • 1/2 cup ketchup
  • 2 Tbsp apple cider vinegar (I use Bragg’s with the mother)
  • 1 tsp salt
  • 1 tsp sugar
  • 1/4 cup pickles, chopped
  • 8 oz shredded cheddar cheese
  • 6 hamburger buns, lightly toasted

Directions:

  • Cook turkey and beef with onion in a Dutch oven until browned; drain well.
  • Stir in tomato sauce, broth, ketchup, vinegar, salt, sugar and pickles until well combined with meat mixture.
  • Cook on med-high heat until fully simmering, reduce heat to low and cook until sauce has been mostly absorbed into the meat. (I cooked mine for about 2 1/2 hours on low.)
  • Serve on toasted buns with a handful of cheese on each sandwich and enjoy!

This recipe serves 6.

Dinner · Lunch · Recipes

Let’s Get “Saucy”!

My apologies for the silly title…I’m starting to really feel the effects of the quarantine! But on a more serious note, pizza is a staple at our house and some weeks we eat homemade pizzas two if not three times a week. My husband is the one who cooks this meal for our family and he always makes the most terrific pizzas! Sometimes we make basic margarita pizzas and that’s exactly what we are making tonight. Now if you know anything about pizza (lol) then you know that you MUST have a great pizza sauce to go on a great pizza. Today, I’m going to share my pizza sauce and the best news is that is super easy along with being super tasty and you can make it ahead of time!

All the ingredients you will need to make this tasty, fun and easy sauce.
Prepping the garlic to be roasted.

You will notice in the recipe that you will need to roast your garlic. By roasting your garlic you will get a deep flavor from those little garlic cloves. Here’s a tip that I use…I grab a small amount of tin foil and make a bowl using my hands. Then place your whole/skin-on garlic cloves in the tin foil and lightly cover with a good olive oil. Fold up the sides and make a ball out of the tin foil and wah-lah….you are all set to roast your garlic! I roast my garlic for about 20 minutes at 350 degrees F. You should just start to smell that fragrant smell of roasted garlic at the 15 minute mark; let it go for about 5 more minutes. Allow the garlic to rest in the tin foil for a few minutes to help cool down. That roasted garlic will squeeze out of its skins when it’s time to add it to the sauce. Now let’s talk about the tomatoes and the process of making the sauce!

I like using Tuttorosso Peeled Plum Italian Style Tomatoes. It’s plum tomatoes in their own juices…nothing added…just tomatoes. This allows you to build your own flavor profile with your unique sauce. You will not be cooking this sauce except when it’s on your pizza and the best part is you get to get your hands dirty by squeezing all those tomatoes and garlic, so this could be fun for kids to make as well. I use a large mixing bowl to squish all of the ingredients together, followed by straining the sauce to separate the juice from the actual sauce itself and lastly I reserve my flavorful tomato juice to have with breakfast or a delicious cocktail! Here are some pics of the process and the recipe!

I use a big bowl to get everything mixed together and incorporated. Be careful when you are squishing those tomatoes…the juice can go everywhere!
This is a snap of the sauce prior to draining off most of the juice. I use this handheld strainer to strain the bulk of the juice off. I also use a spatula to push that juice through the strainer.
Pizza Sauce

Pizza Sauce

Ingredients:

  • 1 (28 oz) can of Italian Style Peeled Plum Tomatoes
  • 3 cloves of garlic, roasted with skin on
  • 1 tsp of sea salt
  • 1 tsp of sugar
  • 1 Tbsp Italian Seasoning (optional)
  • Olive oil for roasting garlic

Directions:

  • Roast garlic in a 350 degree F oven. (Directions for this above) Allow garlic to cool.
  • Add tomatoes and garlic to a large mixing bowl and squish by hand until all tomatoes are broken.
  • Add salt, sugar and Italian seasoning and mix by hand.
  • Taste to make sure you have a good balance of salt and sugar.
  • Strain the sauce into a second large mixing bowl and reserve any left over tomato juice for drinking.
  • Add to pizza! Store any left overs. Leftovers will keep in the refrigerator for up to one week.
  • Enjoy!
Dinner · Recipes

Cheesy-Creamy Ravioli Bake

As a working mom I am always on the hunt for something fast, easy, fulfilling and healthy. Now that my daughter is 3 1/2 years old we run between preschool, dance classes and soccer practice…well at least before Covid-19 we did. With our busy schedules it’s always nice to have meals like this one to turn to. Today, I am sharing a meal that is fast, easy and a great addition to your work week 30 minute meals. It’s rich, filling and pairs well with a small side salad and/or crusty bread…not to mention a nice red wine! This meal had me at spinach, mushrooms, bacon, tomatoes, cheese and garlic! Now let’s get started on this delicious Cheesy-Creamy Ravioli Bake!

Everything you need for this easy Cheesy-Creamy Ravioli Bake. Bacon, tomatoes, spinach, mushroom stuffed ravioli, Alfredo sauce, onion, garlic and a dash of red pepper flakes.
Somehow I forgot to snap a pic of these cheeses that I use in this meal. These are our family favorites for mozzarella and Parmesan cheese.

One of my favorite tips that I’ve learned over the years is to always layout all of your ingredients and prep your ‘Mise en place’ before you get started. ‘Mise en place’ is a French term that means having all your ingredients measured, cut, peeled, sliced, grated, etc. before you start cooking. It helps to have all of this prep work done before you start cooking so everything can come together at the same time. It’s easy to get overwhelmed when you are busy with a toddler under you feet and also following a new recipe. This tip always helps me out!

Now that you have your ingredients in order, it’s time to get your pot filled with water to boil the noodles and your skillet heating up for the bulk of the meal. It’s very important that if you want yummy pasta of any kind to SALT YOUR WATER! Your pasta water should always taste like sea water to ensure that you get a delicious pasta with lots of flavor.

I like using fine sea salt when I’m cooking and this brand is just from my local grocery store. Always put way more salt in your pasta water prior to boiling…it should taste like the sea! The end result is always full flavor pasta.
I always turn my skillet on to get a good heat on it so that my ingredients will instantly start to cook upon dropping them in. There’s nothing like the sizzle of bacon cooking in a hot cast iron skillet.

This recipe cooks up so fast, it is easy to cleanup and has a delicious taste…not to mention the house smells AMAZING! I hope you and your family enjoy this recipe as much as mine. Now on to the recipe!

Cheesy-Creamy Ravioli Bake

Cheesy-Creamy Ravioli Bake

Ingredients:

  • 2 (9 oz) pkgs mushroom stuffed ravioli
  • 1 bag of spinach
  • 4 slices of thick cut bacon, cooked, drained and chopped into bits
  • 2 large cloves of garlic, diced
  • 1 onion, chopped
  • 1 container of cherry tomatoes, halved
  • 1 (15 oz) container of refrigerated Alfredo sauce
  • 1 cup shredded mozzarella
  • 1/4 tsp red pepper flake
  • Parmesan cheese, for garnish
  • Parsley, for garnish
  • Pepper to taste

Directions:

  • Cook ravioli according to package directions.
  • Cook bacon in a large skillet over medium-high heat until crispy. Drain, reserving 2 Tbsp drippings in skillet. Crumble bacon into bits.
  • Add onions and garlic to skillet; cook 4 to 6 minutes or until tender. Stir in tomatoes; cook for 2 minutes. Stir in red pepper flakes and spinach; cook 3 minutes or until wilted.
  • Stir in Alfredo sauce and add ravioli; sprinkle with cheese. Cover and cook 2 to 3 minutes or until sauce is thoroughly heated and cheese is melted.
  • Sprinkle with bacon, Parmesan cheese and add a dash of pepper and parsley to taste.
  • Enjoy!

Thanks for stopping by and I hope you enjoy!